| This technique is for drawing cylindrical shapes with Macromedia® FreeHand. This is a very basic and simple tutorial which can easily be done in a few minutes. This tutorial was done with FreeHand 9 but the same technique should work with most any version. |
1. Create a new document and click View > Snap To Point. This setting plays an important role in this technique. Next, select the Ellipse tool in the Toolbox.

2. Draw an ellipse in the workspace similar to the example below left. When you release the mouse button you will see the ellipse with four dots around it (below center). The ellipse is a group when you first draw it. We need access to the anchor points so click Modify > Ungroup. The appearance changes to the example shown below right.
3. Choose the Rectangle tool in the Toolbox.

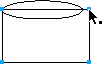
4. Position the mouse pointer over the left point. When you see the small square next to the pointer, you are over the point (below left). Positioning the corner of the rectangle directly over this point will place the corner of the rectangle exactly on the edge of the ellipse. Click and drag to make the rectangle (below right).
 |
5. Position the mouse pointer over the upper right corner of the rectangle. Press and hold the mouse button down and drag the corner of the rectangle until it snaps to the rightmost point of the ellipse (below center). The rectangle now aligns perfectly with the ellipse (below right).
 |  |  |
6. Next, clone the ellipse by clicking and dragging the mouse while holding down the Shift and Alt (Windows®) or Option (Macintosh®) key at the same time (below left). Drag this copy of the rectangle downwards. Release the mouse button before releasing the Shift and Alt/Opt key. The Shift key constrains the position of the cloned ellipse to vertical so it aligns with the original. The mouse pointer has a plus sign next to it indicating that you are cloning the object. You will see this plus sign as long as the Alt/Opt key is held down. Click and drag either the rectangle's bottom left point (below center) or bottom right point (below right) and snap it to the corresponding point of the ellipse. Only one of the two sides needs to be snapped and the direction only needs to be up or down since the width of the rectangle has already been established.
 |  |  |
7. We need to make a copy of the top ellipse because we need to save it. Then we need to combine the original with the rectangle. Click once with the Pointer tool to select it then click Edit > Clone.
![]()

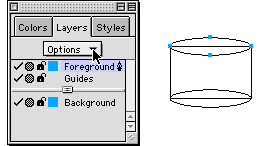
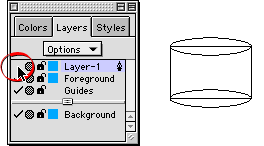
8. In the Layers panel , click the Options button.
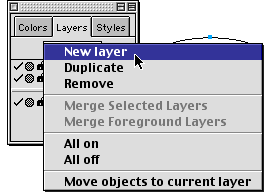
9. Choose "New layer" from the menu.
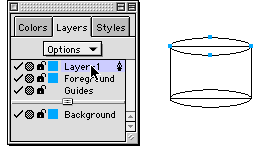
10. The new layer will be called "Layer 1" by default. Click on the layer name (Layer 1) while the top ellipse is selected. This will send the cloned ellipse to Layer 1.
11. Next, click the check mark for Layer 1 to hide it. Note that this ellipse is not selected. This is because you are now looking at the original ellipse in the Foreground layer.
| Note: This is a very common technique when combining objects. Many times you will need to preserve the original object and its position. Simply clone the object and send it to a new layer. Afterwards, you can send the object back to its original layer if you want. |
12. Double-click the Pointer tool and select the "Contact sensitive" check box (FreeHand version 9 and up). If you don't use the contact sensitive setting (or you are using an earlier version) you will need to select them individually while holding the Shift key. The two objects are now selected (below center). Next click Modify > Combine > Union (afterwards you'll have to select the Foreground layer in the Layers panel to bring it back to the Foreground layer). This combines both objects into a single object (below right). While this new object is still selected, click Modify > Arrange > Send To Back. This object needs to be below the ellipse in the stacking order for the next operation to work properly.
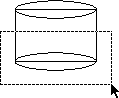 |  |  |
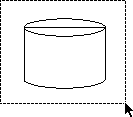
13. Next, marquee-select all the objects (below left). When you do, you will see that all objects are selected (below center). Next, click Modify > Combine > Punch. Your result should look similar to the example shown below right. The "Punch" command knocks the top object out of the bottom object. That's why we made sure the ellipse was on top in the stacking order.
 |  |  |
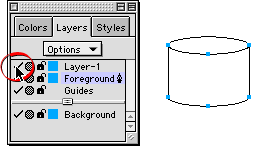
14. Now click the check mark for Layer 1 to make it visible again. You'll see the cloned ellipse made in an earlier step.
15. The cylinder is now complete (below left). You can send the ellipse to the Foreground layer or leave it on Layer 1 if you want. You can even add shading to the cylinder for a more realistic appearance (below right). I chose copper gradient fills for this example. Creating metallic gradients is covered in another tutorial.
 |  |
Next Technique
Source: http://www.sketchpad.net

