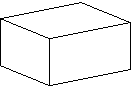
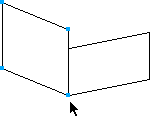
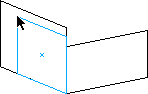
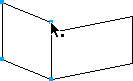
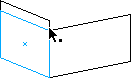
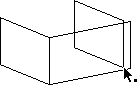
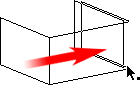
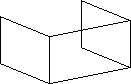
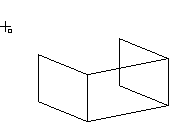
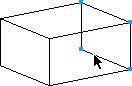
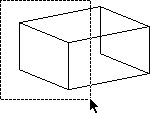
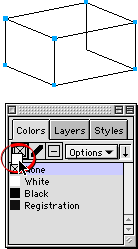
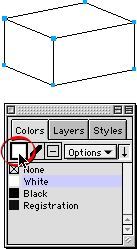
FreeHand® Drawing Technique No. 3 1. Create a new document and click View > Snap To Point. This setting plays an important role in this technique. Next, select the Rectangle tool in the Toolbox. 2. Draw a rectangle in the workspace. 3. Make sure the preferences are setup for "Double-click enables transform handles" (File > Preferences > General). Choose the Pointer tool and double-click the rectangle as shown below left. When the transform handles appear, move the mouse pointer to the position shown below center. Note that the pointer changes to the skew shape. While holding down the Shift key, drag the mouse upwards to skew the rectangle vertically as shown below right. Release the mouse button before the Shift key when the desired amount of skew is attained. The Shift key constrains the skew to vertical. 4. Your example should look similar to the one shown below. 5. With the Rectangle tool, draw another rectangle to the left of the first one as shown below left. Then using the Pointer tool as in a previous step, Shift-drag downwards to skew the rectangle similar to the example below right. 6. Position the mouse pointer near the lower right corner of this new rectangle. When you see a small solid square next to the pointer, it means that you are over an anchor point (below left). When you click and drag you'll be dragging the object from its corner point. Press and hold the mouse button down then drag the object until it snaps to the lower left corner point of the rectangle on the right. 7. Release the mouse button when done (below left). FreeHand has a very aggressive "snap" and will let you know when you've snapped to point. The Mac® version even has cool sounds to alert you. Click and drag the upper left corner to give this rectangle the desired width (below right). Note: When resizing skewed rectangles in FreeHand, the angles are preserved, which makes them very easy to adjust. This is very important when making technical illustrations. Only Macromedia FreeHand and Deneba Canvas™ support this feature. 8. Next, click and drag the opposite point (below left) until it snaps to the corner point of the rectangle on the right (below right). 9. The two rectangles are now complete (below left). Next, clone the left rectangle by clicking and dragging the mouse while holding down the Alt (Windows®) or Option (Macintosh®) key at the same time (below right). Drag this copy of the rectangle to the right. Release the mouse button before releasing the Alt/Opt key. The mouse pointer has a plus sign next to it indicating that you are cloning the object. You will see this plus sign as long as the Alt/Opt key is held down. 10. As shown in a previous step, position the mouse pointer over the corner point of this rectangle (below left), then drag it to the right until it snaps to the corner point of the first rectangle (below right). 11. You now have a three-sided box as shown below. The purpose of the last rectangle was to provide points to snap to the top which we will be making in the following steps. 12. Select either the Pen tool or the Bezigon tool in the Toolbox. 13. Create a four-sided object just above the rectangles as in the following illustrations. The size, shape and position of the object is not important. 14. Next snap the corner points of this new object to the four corners of the three-sided box below. The first point is already selected. A selected point appears as a hollow square. Start by snapping this point to the upper left corner of the leftmost rectangle then select and snap each of the remaining points in turn... 15. Now select the far right rectangle and send it to the back of the stack by clicking Modify > Arrange > Send To Back. Depending on your preference, you can either delete this rectangle by pressing the Backspace or Delete key (below right), or you can do the following steps... 16. Marquee-select the top, left and center objects. FreeHand 9 allows the Pointer tool to be contact-sensitive so the objects don't have to be completely surrounded by the marquee. 17. Bring up the Color List and drag the color chip of your choice over the fill selector. In this case I chose white. All three objects will get a white fill thereby obscuring the rectangle at the bottom of the stack. 18. The finished box is shown below. Source: http://www.sketchpad.net
Part A
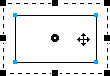
This very simple and basic technique is for drawing isometric or oblique rectangular shapes with Macromedia® FreeHand. This tutorial uses FreeHand 9, but the steps should be the same for most any version. This is just a loose drawing technique for making freeform isometric or oblique shapes "on the fly". In other words, we're not using any measurements. It is handy for making quick shapes where measurements are not critical. In the next tutorial I'll show you how to use the Transform palette to control the angles.

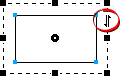
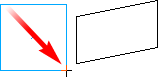
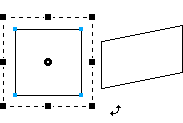
![]()


![]()

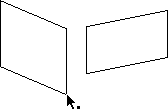
![]()
![]()
![]()
![]()
FreeHand® Drawing Technique No. 3![]()
![]()


Part B
![]()
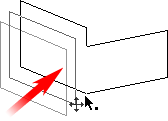
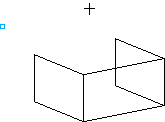
![]()

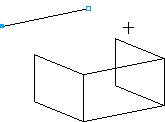
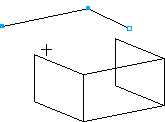
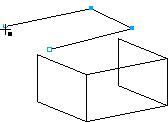
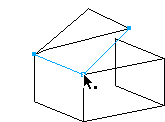
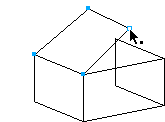
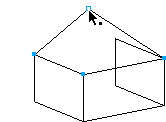
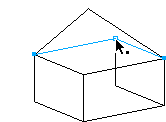
Click...
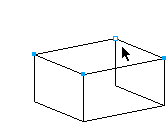
Click...
Click...
Click...
Look for the pointer with the solid square...
Click to close the object
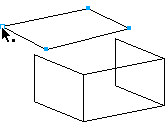
Snap to point
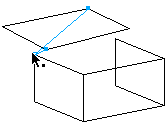
Click and release to select point...
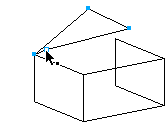
Snap to point
Click and release to select point...
Snap to point

Click and release to select point...
Snap to point
Done...
![]()
![]()
![]()
![]()
![]()
![]()
Next Technique

